The title of this post is the comment our girlies got at ballet as they were eating their snack of a fresh roll in between classes! I think I know of one Mom who probably had to listen to reasons why it would be good to home school last night! Sorry!
We had our friends, Stacy and Tatum, over and we baked and baked and baked. Now, back in the day I used to bake, but it's been a long time for me so I was happy to have Stacy share her recipes and skills!
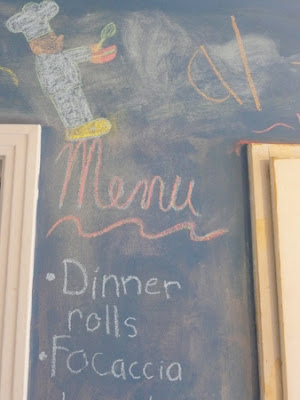
On the menu were Dinner Rolls and Focaccia Bread...
This is the chalkboard wall in our kitchen...prepared for the day by Madison and Lane!
We incorporated a little Italian lesson into the day because we were making Focaccia Bread.
All day long the girlies cooked side by side - tandem cooking with Tatum!!!
I got the biggest kick out of seeing their bowls side by side, their cookie sheets side by side...sharing experiences with friends is just the best!
Madison hung out with us (you will see her green fingernails here and there) - don't you love the casual photographer pose? Just lean against the mixer and go for it.
The actual logistics of baking two different things and having the timing come out right at first seemed a bit overwhelming to me, but before I could panic Stacy laid out the schedule. We started with the dinner rolls, let them rise in their bowl and after they were shaped and transferred to the cookies sheets we could then use the bowls to mix the focaccia...while we made the focaccia the rolls rose and as the dinner rolls baked the focaccia rose and when the rolls were done cooking the focaccia went into the oven...AMAZING!
Lots of wonderful ingredients went in to the breads...including Stacy's farm-fresh eggs!
Rather than give you the step by step recipe I am going to share the tips that Stacy showed us...
This first one is so smart - do you see the little piles of yeast in there with the flour and butter? 4 and 1/2 teaspoons of yeast...each one in a little pile so if you lose count? - just look down and see where you are!
Just look at the beautiful colour of those real eggs!
Lesson number two - you can knead right in the bowl!!! No need to mess up the counter...just add the last of your ingredients and dig in with both hands! Scrape all the excess off the sides of the bowl, mix it well, and start kneading.
You don't have to go crazy with the kneading either, push and fold, push and fold - maybe a few minutes and you're ready to put in a dash of oil, swish the dough around and cover it to rise.
Fresh bread rising in the window...I felt like I was Suzy Home-maker (even though all I did was take the pictures!)
Lane took a little break while the dough was rising....
At one point there was even time for a game of Chinese checkers!
Well, now the dough has risen and it is time to punch it down and form the rolls.
It seems crazy after waiting all that time for the dough to rise...to just beat it back down again...but it has to be done...
And, truth be told - it looks kinda fun!
Lesson number...oh, I don't know, but here it is. We wanted to try and make 2 dozen rolls each so Stacy suggested dividing the dough into smaller balls and then each one could form so many rolls! Much easier to eyeball the size of each roll from a smaller ball of dough.
Forming the rolls is a tiny bit tricky - you want a round roll, but it is important to get the air bubbles our for a dense roll...Stacy showed us how to pinch and pull and tuck to create the perfect roll. Let's see if I can describe the process....You pinch off a ball of dough, holding it with both hands keep forming a ball while tucking the edges under and pinching them into the center of the bottom, when you've done that several times place the ball in your palm and pinch the bottom together like a special little treasure. Place round side up onto the baking sheet. (if that doesn't make sense, just call Stacy!)
Here we go again with the tandem cooking!!!!!!!
Another lesson...it is worth it to buy and use parchment paper. Don't be cheap like me and convince yourself that you don't need it. It really helps the rolls to cook more evenly - and it doesn't hurt for easy clean-up either.
Look how beautifully they rise!
Into the oven and Ta Da! Gorgeous, home-made, mouth-watering dinner rolls.
My final lesson from Stacy for today...and it's a good one....rub a stick of butter all over the rolls right after they come out of the oven!!!!!!! It is for cosmetic purposes only, of course, as it makes the rolls very shiny!
And, we didn't hesitate...
Everyone dove right in! (Stacy and I chose not to be photographed eating ours!)
So thanks to our cooking partners - it was great fun, we learned a lot, and our tummies are nice and full of soft, tasty bread!
Next time - I'll share the focaccia bread! Until then...I really feel people should be baking something everyday! Then you will all have the same problem I do - trying to eat it all before it gets stale!
xoxo Elizabeth


